

Imagine biting into a warm, gooey slice of homemade chocolate chip cookie pie, where the rich aroma of melting chocolate mingles with the sweet scent of vanilla, creating an irresistible allure that draws you in. Each forkful delivers a delightful contrast of crispy edges and a soft, decadent center, making this dessert the ultimate indulgence for any occasion—from cozy family gatherings to festive celebrations.
I still remember the first time I made this cookie pie; it was a rainy afternoon, and my little kitchen transformed into a cozy haven filled with laughter and the enticing smell of baked goodness. As we gathered around the table, each bite sparked joy and nostalgia, reminding us that some moments are best celebrated with delicious treats that bring people together. You won’t want to miss out on this flavor-packed experience that promises to leave your taste buds dancing!
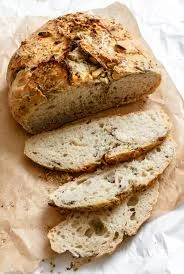
Why is Garlic Herb Dutch Oven Bread a Must-Try?
Imagine the aroma of freshly baked bread wafting through your kitchen.
This recipe is a game-changer, as it’s incredibly easy to whip up with minimal ingredients.
Packed with bold garlic and herb flavors, it elevates any meal.
Versatile, you can enjoy it as a sandwich, side, or snack.
Perfectly crispy on the outside and soft inside, it’s sure to impress family and friends!
Garlic Herb Dutch Oven Bread Ingredients
For the Bread
- All-purpose flour – a versatile base that gives your bread its structure.
- Active dry yeast – essential for that delightful rise; make sure it’s fresh for the best results.
- Salt – enhances flavor and strengthens the dough; don’t skip it!
- Warm water – activates the yeast; aim for a temperature of about 110°F (43°C).
- Olive oil – adds moisture and richness to the dough, making it soft and flavorful.
For the Garlic Herb Mixture
- Fresh garlic – minced for a robust flavor; feel free to adjust according to your taste.
- Fresh herbs (like rosemary and thyme) – these fragrant additions elevate the flavor profile of your Garlic Herb Dutch Oven Bread.
- Butter – melted, it helps in brushing over the top before baking for a golden crust.
This Garlic Herb Dutch Oven Bread is not just a recipe; it’s an experience waiting to unfold in your kitchen!
How to Make Garlic Herb Dutch Oven Bread
1. Combine ingredients. In a large mixing bowl, whisk together flour, salt, and yeast. Once combined, stir in warm water until a shaggy dough forms—this should take about 2-3 minutes.
2. Knead the dough. Transfer the dough onto a lightly floured surface and knead for about 8-10 minutes, until it becomes smooth and elastic. You’ll know it’s ready when it springs back after a gentle poke.
3. Let it rise. Place the kneaded dough in a greased bowl, cover with a kitchen towel, and let it rise in a warm spot for 1-2 hours or until doubled in size—watch for that fluffy transformation!
4. Add garlic herbs. Once risen, gently punch down the dough to release air bubbles. Fold in minced garlic and your choice of chopped fresh herbs like rosemary or thyme, ensuring even distribution.
5. Shape the loaf. Lightly flour your work surface again, then shape the dough into a round loaf. Place it seam-side down on parchment paper while you preheat your oven to 450°F.
6. Prepare the Dutch oven. Preheat your Dutch oven inside the oven as well for about 30 minutes. This will help create that perfect crispy crust when baking!
7. Bake the bread. Carefully transfer your dough with parchment into the hot Dutch oven, cover with the lid, and bake for 30 minutes. Then remove the lid and bake for an additional 15 minutes until golden brown.
8. Cool completely. Remove the bread from the pot and let it cool on a wire rack for at least 20 minutes before slicing—this helps set that delicious crust!
Optional: For extra flavor, brush with melted butter right after baking.
Exact quantities are listed in the recipe card below.
Expert Tips for Garlic Herb Dutch Oven Bread
- Knead Wisely: Ensure you knead the dough just until smooth. Over-kneading can lead to tough bread instead of soft, fluffy goodness.
- Hydration Matters: Use the right amount of water. A wetter dough yields a more open crumb, perfect for your Garlic Herb Dutch Oven Bread.
- Preheat Your Pot: Always preheat your Dutch oven. This step creates that lovely crust we all crave while baking.
- Use Fresh Herbs: Opt for fresh herbs over dried ones for a more vibrant flavor. They elevate your Garlic Herb Dutch Oven Bread to gourmet levels.
- Don’t Rush Proofing: Allow the dough to rise fully for optimal flavor and texture. Rushing this step can result in dense bread.
- Cooling Time: Be patient! Let the bread cool completely before slicing. This helps set the crumb and enhances flavor.
How to Store and Freeze Garlic Herb Dutch Oven Bread

- Room Temperature: Store your Garlic Herb Dutch Oven Bread in a paper bag or wrapped in a clean kitchen towel for up to 3 days to maintain its crusty exterior.
- Fridge: If you need to keep it longer, wrap the bread tightly in plastic wrap and store it in the fridge for up to 1 week. This helps prevent mold but may soften the crust.
- Freezer: For the best preservation, slice the bread, wrap each slice in plastic wrap, and place them in an airtight container or freezer bag. It will stay fresh for up to 3 months.
- Reheating: To enjoy that freshly-baked taste, reheat slices in a toaster or oven at 350°F (175°C) for about 5–10 minutes until warm and crispy.
Garlic Herb Dutch Oven Bread Variations
Customize this delightful bread to make it your own, adding unique flavors and textures for a truly memorable experience.
- Gluten-Free: Use a gluten-free flour blend to ensure everyone can enjoy this comforting loaf without worry. It may require a bit more liquid, so keep an eye on the dough’s consistency.
- Cheesy Delight: Stir in shredded mozzarella or cheddar for a gooey, cheesy twist that melts beautifully as it bakes. The richness of the cheese elevates the bread, making it perfect for pairing with soups.
- Spicy Kick: Add red pepper flakes or diced jalapeños for a warm, spicy flavor that brings excitement to every bite. This variation is ideal for those who love a bit of heat in their meals.
- Herb Infusion: Experiment with different herbs like rosemary, thyme, or oregano to create your signature flavor profile. Fresh or dried herbs can transform the bread into something uniquely yours.
- Sweet Twist: Incorporate a tablespoon of honey or maple syrup for a subtly sweet version that pairs perfectly with breakfast spreads. This twist adds warmth and depth, making it an excellent choice for brunch gatherings.
- Nutty Crunch: Fold in toasted sunflower seeds or chopped walnuts for added texture and nutrition. The crunch complements the soft interior, creating an enjoyable contrast in every slice.
- Zesty Citrus: Grate some lemon or orange zest into the dough to brighten up the flavors and add a refreshing aroma. This variation is perfect for summer dinners when you want something light and uplifting.
- Savory Olive: Mix in chopped olives for a Mediterranean flair that enhances both flavor and texture. The brininess from the olives adds depth and personality to each loaf you create.
Make Ahead Options
Garlic Herb Dutch Oven Bread is a wonderful recipe for meal prep, allowing you to save time while still enjoying fresh-baked bread. To get ahead, you can mix the dry ingredients and store them in an airtight container for up to 3 days. Additionally, you can prepare the dough up to 24 hours in advance; simply cover it tightly with plastic wrap and refrigerate. When you’re ready to bake, let the dough come to room temperature for about 30 minutes before shaping it and letting it rise. To maintain quality, avoid over-kneading and ensure your Dutch oven is preheated properly before baking. Enjoy this delightful loaf with minimal hassle!
Garlic Herb Dutch Oven Bread Recipe FAQs
What type of flour is best for Garlic Herb Dutch Oven Bread?
For the best texture and flavor, I recommend using bread flour. It has a higher protein content than all-purpose flour, which helps create that lovely chewy crust and airy interior. If you only have all-purpose flour on hand, it will still work beautifully; just know the texture may be slightly different.
How should I store leftover Garlic Herb Dutch Oven Bread?
To keep your bread fresh, wrap it in a clean kitchen towel and store it at room temperature for up to 2 days. If you need it to last longer, place it in a plastic bag or an airtight container. Avoid refrigerating it, as this can dry out the bread faster.
Can I freeze Garlic Herb Dutch Oven Bread?
Absolutely! To freeze, let the bread cool completely, then wrap it tightly in plastic wrap and place it in a freezer-safe bag. It can be frozen for up to 3 months. When you’re ready to enjoy it again, simply thaw it at room temperature and reheat in the oven at 350°F (175°C) for about 10 minutes to restore its crustiness.
What if my dough doesn’t rise properly?
If your dough isn’t rising as expected, check that your yeast is fresh. Old yeast can lead to flat bread. Also, make sure the environment is warm enough; dough typically rises best between 75°F and 80°F (24°C – 27°C). If needed, find a cozy spot like an oven with just the light on or near a sunny window.
Can I make this recipe gluten-free?
Yes! You can use a gluten-free all-purpose flour blend that includes xanthan gum to help with structure. Keep in mind that gluten-free doughs often require different hydration levels, so you might need to adjust the amount of liquid slightly based on your chosen blend.
What herbs work best in this recipe?
Feel free to get creative with your herbs! Fresh rosemary, thyme, and oregano are fantastic choices that complement the garlic beautifully. Dried herbs work too; just remember they’re more concentrated—use about one-third of the amount called for fresh herbs. Enjoy experimenting until you find your perfect blend!
Garlic Herb Dutch Oven Bread
Ingredients
Method
- In a large mixing bowl, whisk together flour, salt, and yeast. Once combined, stir in warm water until a shaggy dough forms—this should take about 2-3 minutes.
- Transfer the dough onto a lightly floured surface and knead for about 8-10 minutes, until it becomes smooth and elastic.
- Place the kneaded dough in a greased bowl, cover with a kitchen towel, and let it rise in a warm spot for 1-2 hours or until doubled in size.
- Once risen, gently punch down the dough to release air bubbles. Fold in minced garlic and your choice of chopped fresh herbs.
- Lightly flour your work surface again, then shape the dough into a round loaf. Place it seam-side down on parchment paper.
- Preheat your Dutch oven inside the oven at 450°F for about 30 minutes.
- Carefully transfer your dough with parchment into the hot Dutch oven, cover with the lid, and bake for 30 minutes. Then remove the lid and bake for an additional 15 minutes until golden brown.
- Remove the bread from the pot and let it cool on a wire rack for at least 20 minutes before slicing.


Leave a Comment