

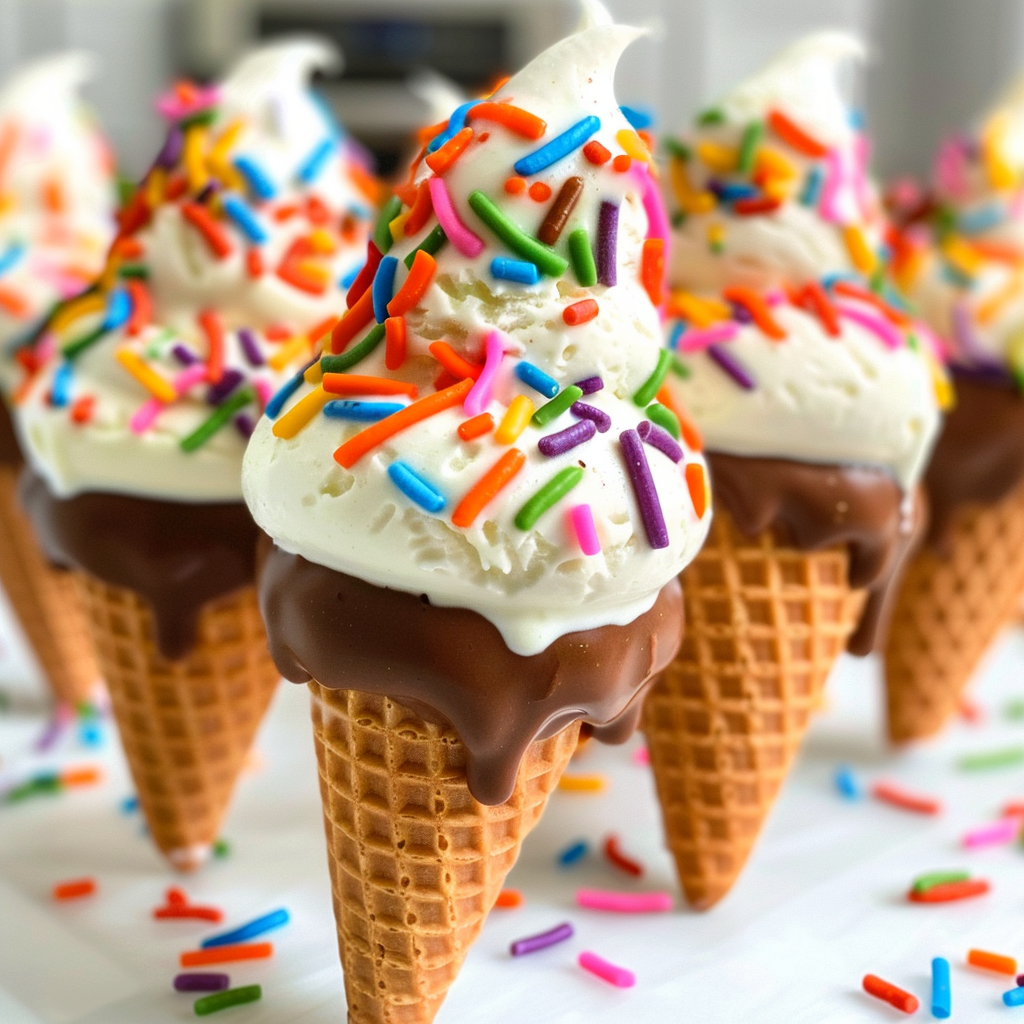
There’s something undeniably joyful about the combination of cake and ice cream, isn’t there? Now, imagine that delightful duo presented as Ice Cream Cone Cake Pops. Picture fluffy cake, sweet frosting, and a crunchy cone all rolled into one irresistible treat. delicious pumpkin cupcakes pumpkin oatmeal cream pies They’re not just dessert; they’re an experience! Each bite is a sweet, creamy wonderland that will make your taste buds dance with glee.
I can still remember the first time I made these magical pops. It was a sunny Saturday afternoon, and my kitchen was filled with the aroma of freshly baked cake. I had invited friends over for a little get-together, and I wanted to impress them with something fun and unique. apple maple munchkins As we gathered around, laughter filling the air, we took our first bites of those Ice Cream Cone Cake Pops. The joy on everyone’s faces was priceless! It was like unwrapping a gift you never knew you wanted.
Why You'll Love This Ice Cream Cone Cake Pops
- This amazing Ice Cream Cone Cake Pops offers more than just flavor; it makes meal prep a breeze.
- You can easily customize the ingredients based on what you have on hand.
- The vibrant colors and aromas make it visually stunning on any dinner table.
- Perfect for grilling but versatile enough for baking or pan-searing.
Ingredients for Ice Cream Cone Cake Pops
Here’s what you’ll need to make this delicious Ice Cream Cone Cake Pops:
- Cake Mix: Choose your favorite flavor—chocolate or vanilla work wonders in this recipe!
- Eggs: You’ll need three large eggs to help bind the cake mix together.
- Water: About one cup should do; it’s crucial for moistness.
- Frosting: Store-bought or homemade; pick a flavor that complements your cake.
- Ice Cream Cones: Regular cones create a classic look; waffle cones add an extra crunch!
- Chocolate Melts: These are perfect for coating and adding that delightful chocolatey goodness.
- Sprinkles: Optional but highly encouraged for that festive flair!
The full ingredients list, including measurements, is provided in the recipe card directly below.

How to Make Ice Cream Cone Cake Pops
Follow these simple steps to prepare this delicious Ice Cream Cone Cake Pops:
Step 1: Bake the Cake
Preheat your oven to 350°F (175°C). Prepare a baking dish by greasing it lightly. In a mixing bowl, combine the cake mix, eggs, and water until smooth. Pour this delightful mixture into your prepared dish and bake according to package instructions until golden brown.
Step 2: Cool and Crumble
Once baked, let your cake cool completely—this is crucial unless you want melted frosting soup! After cooling, crumble the cake into fine pieces in a large bowl.
Step 3: Mix in Frosting
Add about half a cup of frosting to your crumbled cake mixture. Mix well until everything is evenly coated and forms a dough-like consistency. It should be moist but not overly sticky.
Step 4: Form Your Pops
Take small portions of the cake mixture and shape them into balls—about the size of a golf ball works perfectly! Place each ball on top of an ice cream cone so it looks like an adorable little scoop!
Step 5: Melt Chocolate
In a microwave-safe bowl, melt your chocolate melts according to package instructions until smooth—be careful not to burn it!
Step 6: Dip and Decorate
Dip each cake pop into the melted chocolate until fully coated. Allow excess chocolate to drip off before sprinkling with colorful sprinkles for extra pizzazz! Let them set on parchment paper until hardened.
Transfer to plates and enjoy these whimsical treats with family and friends—they’re sure to be a hit at parties or any fun gathering!
And there you have it—the ultimate guide to making Ice Cream Cone Cake Pops! Whether you’re celebrating something special or just indulging in some sweet nostalgia from childhood, these pops are bound to bring smiles all around!
You Must Know About Ice Cream Cone Cake Pops
- This amazing Ice Cream Cone Cake Pops offers more than just flavor; it makes meal prep a breeze.
- You can easily customize the ingredients based on what you have on hand.
- The vibrant colors and aromas make it visually stunning on any dinner table.
- Perfect for grilling but versatile enough for baking or pan-searing.
Perfecting Ice Cream Cone Cake Pops Cooking Process
Start by gathering your ingredients: cake mix, frosting, and cones. Bake the cake first, let it cool, and crumble it before mixing with frosting for a perfect blend. Fill cones with the mixture and chill before dipping in chocolate.
Add Your Touch to Ice Cream Cone Cake Pops
Try swapping the cake mix for a gluten-free option or add sprinkles for extra fun. You can also use different flavored frostings like chocolate or caramel to suit your taste.
Storing & Reheating Ice Cream Cone Cake Pops
Store leftover pops in an airtight container in the fridge for up to three days. To refresh them, pop them in the microwave for a few seconds before enjoying again.
Chef's Helpful Tips for Ice Cream Cone Cake Pops
- Always ensure your cake is completely cool before crumbling; warm cake can lead to a mushy mixture.
- Use quality chocolate melts for coating; they give a smooth finish that hardens nicely.
- Don’t overload the cones – less is more!
I remember the day I made these Ice Cream Cone Cake Pops for my niece’s birthday party. Her face lit up when she saw them, and they vanished faster than you could say “sugar rush.”
FAQs About Ice Cream Cone Cake Pops
What is Ice Cream Cone Cake Pops?
Ice Cream Cone Cake Pops are delightful treats that combine the fun of cake pops with the whimsy of ice cream cones. These cake pops are made by baking a cake mix, which is then crumbled and mixed with frosting to form a dough. The mixture is shaped into balls and placed on top of mini ice cream cones, creating a visually appealing dessert. They are perfect for parties, birthdays, or any occasion where you want to impress your guests with a unique treat. Enjoying these cake pops will surely bring a smile to anyone’s face.
How do you make Ice Cream Cone Cake Pops?
To make Ice Cream Cone Cake Pops, start by baking your favorite cake. Once baked, crumble the cake into a large bowl and mix it with frosting until you achieve a dough-like consistency. Shape the mixture into balls and attach them to mini ice cream cones using melted chocolate as glue. chocolate orange posset Dip the entire creation in chocolate coating and add sprinkles for decoration. Allow them to set in the fridge before serving. This method ensures that your treats not only taste delicious but also look stunning.
Are Ice Cream Cone Cake Pops suitable for kids?
Yes, Ice Cream Cone Cake Pops are perfect for kids! They are fun to eat and can be customized with various flavors and decorations. Kids love the combination of cake and frosting, all presented in an adorable ice cream cone. Additionally, they can help decorate their own cake pops with sprinkles and toppings, making it a fun family activity. Just be sure to supervise younger children when handling melted chocolate or sharp utensils during preparation. For more inspiration, check out this Boozy Peppermint Dark Chocolate Truffles recipe.
Can I customize my Ice Cream Cone Cake Pops?
Absolutely! Customizing your Ice Cream Cone Cake Pops is one of the best parts of making them. You can use different flavors of cake mixes, frostings, and chocolates for coating. Feel free to add colorful sprinkles, edible glitter, or themed decorations based on holidays or events. This versatility allows you to create unique designs that cater to various tastes and preferences while ensuring everyone enjoys these delightful treats at any gathering.
Conclusion for Ice Cream Cone Cake Pops
In summary, Ice Cream Cone Cake Pops offer an exciting blend of flavors and fun presentation that appeals to both kids and adults alike. These sweet treats are easy to make at home and allow for endless customization options. Whether you’re preparing for a party or just looking for a creative dessert idea, these cake pops will surely delight your guests. Give them a try today and experience the joy they bring! For more inspiration, check out this Delicious Strawberry Cheesecake Cookies recipe.
Ice Cream Cone Cake Pops

Ice Cream Cone Cake Pops are a whimsical fusion of fluffy cake, sweet frosting, and crunchy ice cream cones. Perfect for celebrations or family gatherings, these delightful treats are not only easy to make but also customizable to suit any taste. With vibrant colors and fun decorations, they’re sure to bring smiles to both kids and adults alike!
- Prep Time: 15 minutes
- Cook Time: 25 minutes
- Total Time: 40 minutes
- Yield: Makes approximately 12 cake pops 1x
- Category: Dessert
- Method: Baking
- Cuisine: American
Ingredients
- 1 box cake mix (chocolate or vanilla)
- 3 large eggs
- 1 cup water
- 1/2 cup frosting (store-bought or homemade)
- 12 mini ice cream cones
- 1 cup chocolate melts
- colorful sprinkles (optional)
Instructions
- Preheat oven to 350°F (175°C) and grease a baking dish. Combine cake mix, eggs, and water in a bowl; pour into the dish and bake according to package instructions until golden brown.
- Allow the cake to cool completely before crumbling it into fine pieces in a large bowl.
- Mix crumbled cake with frosting until dough-like consistency forms. Shape into golf ball-sized portions and place on top of each mini cone.
- Melt chocolate according to package instructions. Dip each cake pop into melted chocolate, allowing excess to drip off. Decorate with sprinkles before letting them set on parchment paper.
Nutrition
- Serving Size: 1 serving
- Calories: 160
- Sugar: 12g
- Sodium: 80mg
- Fat: 6g
- Saturated Fat: 3g
- Unsaturated Fat: 2g
- Trans Fat: 0g
- Carbohydrates: 24g
- Fiber: 0g
- Protein: 2g
- Cholesterol: 30mg
Leave a Comment