

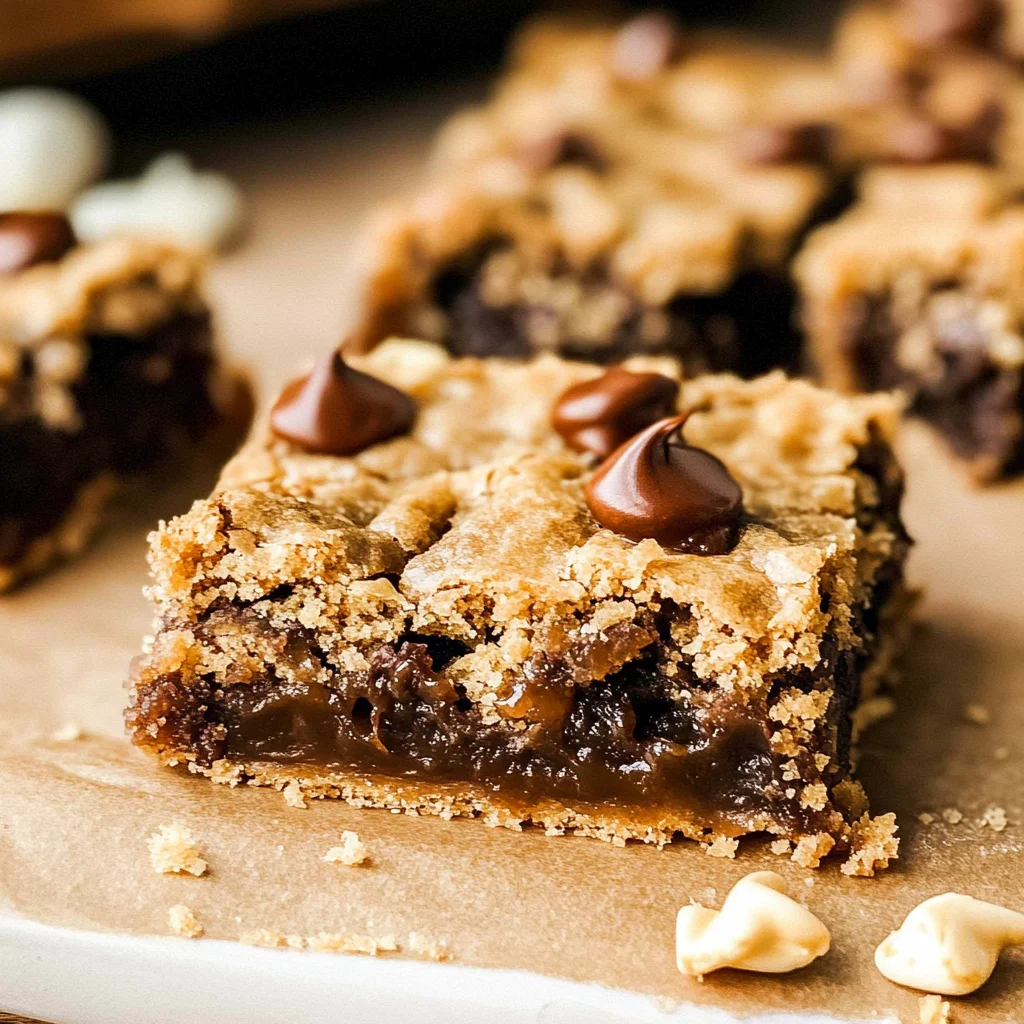
Imagine sinking your teeth into a warm, gooey cookie bar, where the rich chocolate chips melt in your mouth and the crunchy nuts add that perfect texture. With every bite, you’re transported to a cozy kitchen filled with the sweet aroma of baked goodness, teasing your taste buds and promising an unforgettable flavor experience that dances on your palate.
These cookie bars are not just a treat; they evoke memories of lazy Sunday afternoons spent baking with loved ones, laughter echoing as the delicious scent wafts through the house. Perfect for birthday parties or simply a sweet indulgence after a long day, these delightful squares will have you reaching for seconds—because who could resist such a divine creation?
Why Is cookie bars So Irresistibly Good?
Chewy texture: These cookie bars deliver a delightful chewiness that melts in your mouth, making them hard to resist.
Rich flavor: The perfect blend of brown sugar and vanilla extract creates a sweet, caramel-like undertone that elevates every bite.
Chocolate overload: With 2 cups of chocolate chips, each bar is packed with gooey chocolate goodness that satisfies any sweet tooth.
Customizable options: Add your favorite nuts for an extra crunch or mix in dried fruits for a unique twist!
Quick and easy: Ready in just 40 minutes, these cookie bars are the perfect last-minute treat for gatherings or a cozy night in.
cookie bars Ingredients
For the Cookie Base
- 2 cups all-purpose flour – This forms the backbone of your cookie bars, giving them that delightful chewy texture.
- 1 teaspoon baking soda – This helps your cookie bars rise and become perfectly soft.
- 1 teaspoon salt – A pinch of salt enhances the sweetness and balances flavors beautifully.
For the Batter
- 1 cup unsalted butter (softened) – Softened butter creates a creamy base that ensures your cookie bars are rich and flavorful.
- 3/4 cup brown sugar (packed) – Brown sugar adds moisture and a warm caramel flavor to your cookie bars.
- 3/4 cup granulated sugar – This sweetener provides the perfect balance to complement the brown sugar in your treat.
- 1 tablespoon vanilla extract – Pure vanilla extract infuses a delightful aroma that elevates the taste of your cookie bars.
- 2 large eggs – Eggs bind everything together while adding richness to the dough.
For the Sweet Add-ins
- 2 cups chocolate chips – These melty morsels are essential for creating gooey, chocolatey goodness in every bite of your cookie bars.
- 1 cup chopped nuts (optional) – Adding nuts gives a lovely crunch and nutty flavor that complements the chocolate beautifully.
How to Make cookie bars

1. Preheat the oven to 350°F (175°C) and grease a 9×13 inch baking pan. This ensures your cookie bars bake evenly and don’t stick to the pan, making for easy removal.
2. Whisk together the flour, baking soda, and salt in a mixing bowl. Combining these dry ingredients first helps distribute the leavening agent evenly throughout the batter.
3. Cream together the softened butter, brown sugar, and granulated sugar in another bowl until smooth. This should take about 2-3 minutes, creating a light and fluffy texture that adds richness to your cookie bars.
4. Beat in the eggs one at a time, then stir in the vanilla extract. Incorporating the eggs slowly allows for better emulsification, resulting in moist cookie bars with a lovely flavor depth.
5. Blend gradually the dry ingredients into the wet mixture. Mix just until combined; over-mixing can lead to tough bars instead of soft and chewy ones!
6. Fold in the chocolate chips and chopped nuts if using. This is where you can get creative! The chocolate chips add sweetness, while nuts bring a delightful crunch.
7. Spread the batter evenly into the prepared baking pan. Aim for an even layer to ensure uniform baking; this also helps achieve those beautifully golden edges.
8. Bake in the preheated oven for 25-30 minutes, or until the edges are golden brown and a toothpick inserted comes out clean. Keep an eye on them during those last few minutes for that perfect color!
9. Cool in the pan before cutting into bars. Letting them rest helps them set up nicely, making it easier to cut them into squares without crumbling.
Optional: For an extra treat, sprinkle sea salt on top before serving!
Exact quantities are listed in the recipe card below.
Tips for the Best cookie bars
- Butter Consistency: Make sure your butter is softened, not melted. This creates a creamy texture and prevents greasy cookie bars.
- Mixing Method: Cream the sugars and butter until light and fluffy. This helps incorporate air, resulting in chewy, tender cookie bars.
- Egg Temperature: Use room temperature eggs for a smoother batter. Cold eggs can cause the mixture to seize, affecting the final texture.
- Measure Flour Correctly: Spoon flour into measuring cups and level off with a knife. Too much flour can lead to dry cookie bars.
- Don’t Overbake: Keep an eye on your cookie bars as they bake. They should be golden around the edges but still soft in the center for ideal chewiness.
- Cooling Time: Allow your cookie bars to cool completely in the pan before cutting. This helps them set properly and makes slicing easier.
How to Store and Freeze cookie bars
- Room Temperature: Keep your cookie bars in an airtight container for up to 3 days to maintain their chewy texture and rich flavor.
- Fridge: For longer freshness, store the cookie bars in the fridge for up to a week. Just be sure to wrap them tightly!
- Freezer: You can freeze cookie bars for up to 3 months. Slice them individually, wrap each piece in plastic wrap, and place them in a freezer-safe bag.
- Reheating: To enjoy warm cookie bars, simply pop them in the microwave for 10-15 seconds until they’re soft and gooey again.
cookie bars Your Way
Feel free to unleash your creativity and make this recipe uniquely yours with these delightful twists!
- Nut-Free: Omit the nuts entirely for a classic treat that’s safe for nut allergies. This makes the cookie bars extra chewy and chocolatey, perfect for those who prefer a smoother texture.
- Gluten-Free: Substitute all-purpose flour with a 1:1 gluten-free blend to enjoy a deliciously chewy version. Your loved ones won’t even notice the difference as they indulge in these sweet delights.
- Dark Chocolate: Swap regular chocolate chips for dark chocolate chunks for a richer flavor experience. The deep, intense notes of dark chocolate will elevate your cookie bars to gourmet status!
- Oatmeal Twist: Add 1 cup of rolled oats to the batter for a hearty texture and a hint of chewiness. This not only enhances flavor but also adds a wholesome element that makes them feel just a bit more nutritious.
- Peanut Butter Swirl: Incorporate 1/2 cup of creamy peanut butter into the batter before baking for an irresistible nutty flavor. The combination of chocolate and peanut butter creates a timeless flavor duo that everyone will love.
- Spicy Kick: Mix in 1 teaspoon of cinnamon or cayenne pepper for a surprising twist that warms the palate. The subtle heat adds depth, making each bite an exciting taste adventure.
- Dried Fruit Delight: Toss in 1 cup of your favorite dried fruits, like cranberries or cherries, alongside the chocolate chips. This will add bursts of fruity sweetness, balancing the richness with vibrant flavors.
- Vegan Option: Replace butter with coconut oil and eggs with flax eggs (1 tablespoon ground flaxseed + 2.5 tablespoons water per egg). These chewy vegan cookie bars are just as satisfying and delicious!
Make Ahead Options

For those busy days when you crave delicious cookie bars but don’t have time to whip them up from scratch, this recipe is perfect for meal prep. You can prepare the dry ingredients—2 cups of all-purpose flour, 1 teaspoon of baking soda, and 1 teaspoon of salt—in advance and store them in an airtight container for up to 3 days. The wet ingredients can also be prepped: soften 1 cup of unsalted butter, mix it with 3/4 cup each of packed brown sugar and granulated sugar, then blend in the 2 large eggs and 1 tablespoon of vanilla extract. When you’re ready to bake, simply combine the pre-measured dry and wet ingredients, fold in the chocolate chips and optional nuts, spread the batter into a greased pan, and bake at 350°F (175°C) for 25-30 minutes until golden brown. This way, you’ll enjoy fresh cookie bars with minimal effort!
Everything You Need to Know About cookie bars
What type of flour is best for cookie bars?
All-purpose flour works beautifully for cookie bars, providing the right texture and chewiness. If you’re looking for a gluten-free option, you can substitute it with a 1: 1 gluten-free baking blend. Just ensure that the blend contains xanthan gum to help with binding.
Can I use salted butter instead of unsalted?
While unsalted butter is recommended for precise control over the salt content, you can use salted butter if that’s what you have on hand. Just reduce the added salt in the recipe to 1/2 teaspoon to balance out the flavors.
How do I store leftover cookie bars?
To keep your cookie bars fresh and chewy, store them in an airtight container at room temperature. They should stay delicious for about 3-5 days. For longer storage, consider freezing them; they can last up to 3 months when wrapped tightly.
Can I freeze cookie bars?
Absolutely! To freeze cookie bars, let them cool completely, then cut them into individual squares. Wrap each bar in plastic wrap or aluminum foil and place them in a freezer-safe bag. Simply thaw them at room temperature before enjoying!
What if my cookie bars are too crumbly?
If your cookie bars turn out too crumbly, it may be due to over-measuring the flour or not enough moisture. Make sure you spoon the flour into the measuring cup rather than scooping directly from the bag. If they seem dry, try adding an extra tablespoon of melted butter next time.
How many servings does this recipe yield?
This delightful recipe yields about 12 generous servings, making it perfect for sharing with family and friends! Each serving contains approximately 200 calories, so it’s a sweet treat that won’t break the calorie bank.


Leave a Comment