

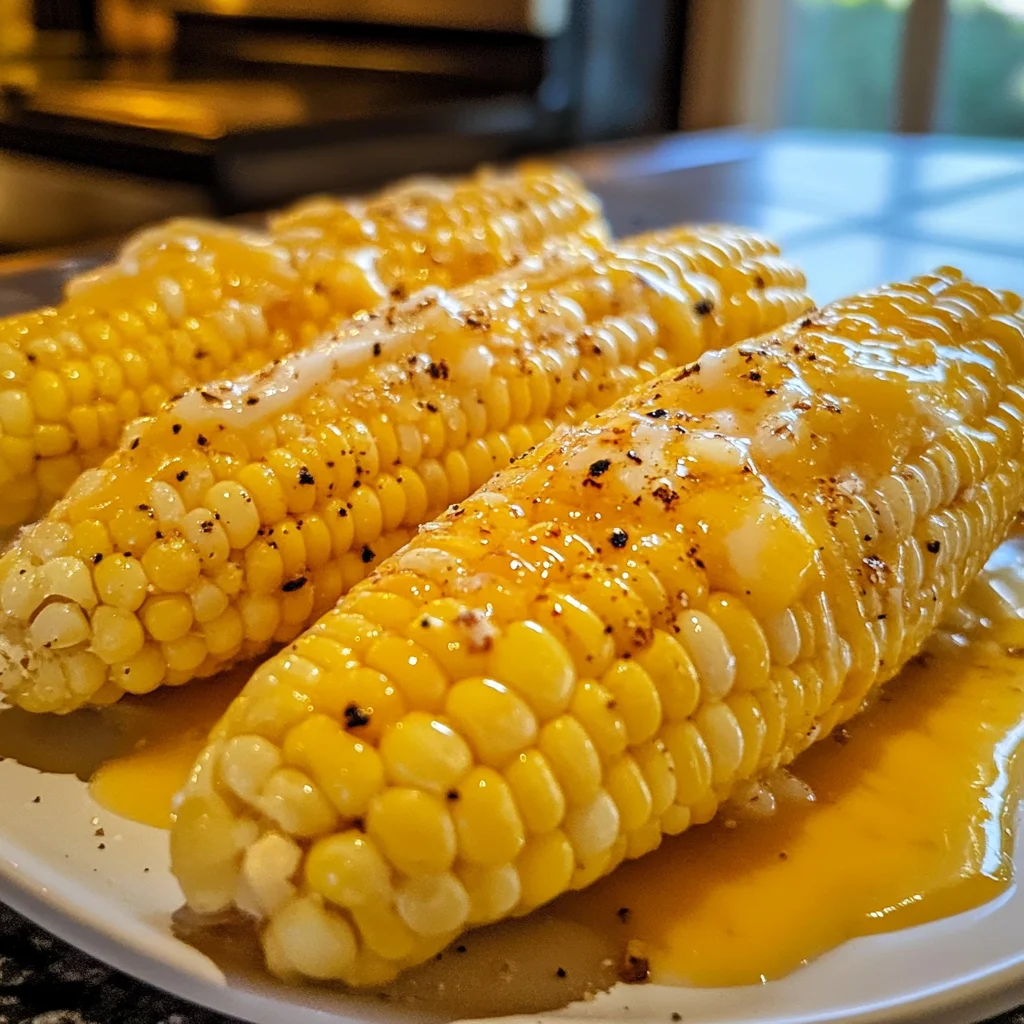
Imagine sinking your teeth into golden, sweet kernels of corn on the cob in the oven, each bite bursting with juicy flavor and a hint of smokiness that dances on your palate. The aroma wafts through the air, reminiscent of summer barbecues and family gatherings, instantly transporting you to sun-soaked days filled with laughter and joy.
I can still recall those lazy afternoons spent peeling back the husks, eagerly anticipating that first taste of warm corn slathered in butter and sprinkled with salt. Whether it’s a backyard cookout or a cozy dinner at home, this roasted delight is the perfect companion for any occasion, promising an unforgettable flavor experience that will have everyone coming back for more.
Why Does Everyone Love corn on the cob in the oven?
Delightfully tender and bursting with flavor, this roasted corn on the cob is a summer staple that will have everyone asking for seconds. Simple preparation means just husking and cleaning the corn, then seasoning it with melted butter, salt, and pepper—easy peasy! Versatile enough to accompany any meal, it can also be customized with your favorite spices. Quick cooking time of just 30 minutes makes it an ideal choice for busy weeknights or last-minute gatherings. Crowd-pleasing goodness ensures that this dish is always a hit at barbecues and family dinners alike!
corn on the cob in the oven Ingredients
- For the Corn
- 4 ears corn on the cob (husked and cleaned) – Fresh, sweet corn is ideal for roasting; look for firm, plump kernels.
- For the Butter
- 4 tablespoons unsalted butter (melted) – Use high-quality butter for a rich flavor that enhances the natural sweetness of the corn.
- For the Seasoning
- 1 teaspoon salt – This balances the sweetness of the corn and brings out all the flavors.
- 1 teaspoon black pepper – Adds a subtle heat that complements the buttery goodness.
- 1 teaspoon paprika (optional) – For a smoky kick, sprinkle this on before roasting your corn on the cob in the oven.
Directions: corn on the cob in the oven

1. Preheat your oven to 400°F (200°C). This temperature will ensure your corn gets that perfect roasted flavor and slightly caramelized edges.
2. Husk the 4 ears of corn on the cob and remove all silk strands. Make sure to clean them thoroughly, as this will help enhance the deliciousness of each bite.
3. Wrap each ear of corn tightly in aluminum foil. This keeps moisture in and ensures your corn cooks evenly, becoming tender and juicy.
4. Place the wrapped corn on a baking sheet. This makes it easy to transfer in and out of the oven without any mess.
5. Bake in the preheated oven for 30 minutes. The aroma will fill your kitchen as the corn roasts to perfection, turning slightly golden.
6. Remove from the oven and carefully unwrap the foil, being cautious of steam! The corn should be incredibly tender and ready for some extra flavor.
7. Brush with 4 tablespoons of melted unsalted butter, then sprinkle with 1 teaspoon salt, 1 teaspoon black pepper, and paprika if desired. This finishing touch elevates the taste to pure summer bliss!
Optional: For a zesty kick, squeeze fresh lime juice over the finished corn before serving.
Exact quantities are listed in the recipe card below.
Tips for the Best corn on the cob in the oven
- Fresh Corn: Choose sweet, fresh corn on the cob for the best flavor; avoid any with brown or dry silk.
- Silk Removal: Ensure all silk strands are removed completely; lingering silk can burn and affect taste.
- Foil Wrapping: Wrap the corn tightly in aluminum foil to trap moisture, ensuring it steams perfectly while baking.
- Butter Timing: Brush melted butter on immediately after unwrapping; this helps it soak into the warm kernels for maximum flavor.
- Seasoning Variations: Feel free to experiment with seasonings like garlic powder or chili powder, but don’t skimp on salt and pepper for balance.
- Baking Sheet Use: Always use a baking sheet when roasting corn on the cob in the oven; it catches drips and keeps your oven clean.
How to Store and Freeze corn on the cob in the oven
- Fridge: Store leftover corn on the cob in an airtight container for up to 3 days. This will keep it fresh and flavorful, ready for your next meal.
- Freezer: Wrap individual cob pieces tightly in plastic wrap, then place them in a freezer bag. They’ll last up to 6 months, perfect for future barbecues!
- Reheating: For best results, reheat corn on the cob in the oven at 350°F (175°C) for about 10-15 minutes until warmed through, maintaining its deliciousness.
- Seasoning: If you’ve seasoned your corn with butter and spices, it’s best to consume it within a day for optimal taste and texture!
corn on the cob in the oven Your Way
Feel free to get creative with this beloved summer staple and make it truly your own!
- Spicy Kick: Add 1 teaspoon of cayenne pepper for a fiery twist. This simple addition elevates the corn’s flavor profile, making it a standout dish at any gathering.
- Zesty Lime: Squeeze fresh lime juice over the corn just before serving. The citrusy brightness complements the sweetness of the corn beautifully and adds a refreshing zing.
- Herb Infusion: Mix in 1 tablespoon of fresh chopped herbs like cilantro or basil with the butter. These aromatic herbs will infuse each bite with vibrant flavor and make your dish feel gourmet.
- Cheesy Delight: Sprinkle grated Parmesan cheese on top right after roasting. The melted cheese creates a savory crust that pairs perfectly with the sweet corn.
- Garlic Butter: Add minced garlic to the melted butter for an irresistible aroma and depth of flavor. This twist makes your roasted corn feel like a treat from your favorite restaurant.
- Smoky Flavor: Use smoked paprika instead of regular paprika for an extra layer of deliciousness. This subtle smokiness will transport you straight to a backyard barbecue.
- Sweet Glaze: Drizzle honey over the corn after roasting for a touch of sweetness. This unexpected addition enhances the natural sugars in the corn, creating a delightful contrast.
- Nutty Crunch: Top with toasted nuts, like chopped pecans or almonds. This adds not only texture but also an earthy richness to each bite, making your roasted corn unforgettable.
Make Ahead Options

Preparing corn on the cob in the oven is a fantastic choice for meal prep, allowing you to enjoy this delicious side dish without the last-minute rush. You can husk and clean the corn up to 24 hours in advance, ensuring all silk strands are removed. Simply wrap each ear in aluminum foil, which can also be done ahead of time, and store them in the refrigerator until you’re ready to cook. When it’s time to serve, preheat your oven to 400°F (200°C), place the wrapped corn on a baking sheet, and bake for 30 minutes. After removing it from the oven and unwrapping the foil, brush with melted butter and sprinkle with salt, pepper, and optional paprika for that extra kick. This way, you can enjoy perfectly roasted corn on the cob in the oven while saving precious time during your busy summer gatherings!
corn on the cob in the oven Recipe FAQs
How do I choose the best corn on the cob?
Look for corn with bright green husks and moist silk. The kernels should be plump and tightly packed. If you can, gently peel back a bit of the husk to check for milky, juicy kernels—a sign of freshness! Aim for four ears for this recipe, ensuring they all fit comfortably in your oven.
Can I store leftover roasted corn on the cob?
Absolutely! You can store any leftovers in an airtight container in the fridge for up to 3 days. Just make sure to wrap them tightly to keep that delicious flavor intact. When you’re ready to enjoy them again, a quick reheat in the oven or microwave will bring them back to life!
Can I freeze corn on the cob after roasting?
Yes, you can freeze roasted corn on the cob! After it cools completely, wrap each ear tightly in plastic wrap and then place them in a freezer-safe bag. They can be frozen for up to 6 months. When you’re ready to eat, thaw overnight in the fridge and reheat as desired.
What should I do if my corn isn’t tender after baking?
If your corn isn’t tender after 30 minutes, it’s likely due to differences in size or freshness. Simply rewrap it and return it to the oven for an additional 5-10 minutes until it reaches that perfect tender bite. Keep an eye on it so that it doesn’t overcook!
How many servings does this recipe yield?
This recipe yields 4 servings, making it a fantastic side dish for family barbecues or summer gatherings. At about 150 calories per serving, it’s a light and satisfying addition to any meal!
What are some variations I can try with seasoning?
Feel free to get creative with your seasoning! Besides salt and pepper, you can add garlic powder, chili powder, or even fresh herbs like cilantro or parsley for added flavor. A sprinkle of cheese after brushing with butter can also elevate your roasted corn game!


Leave a Comment