

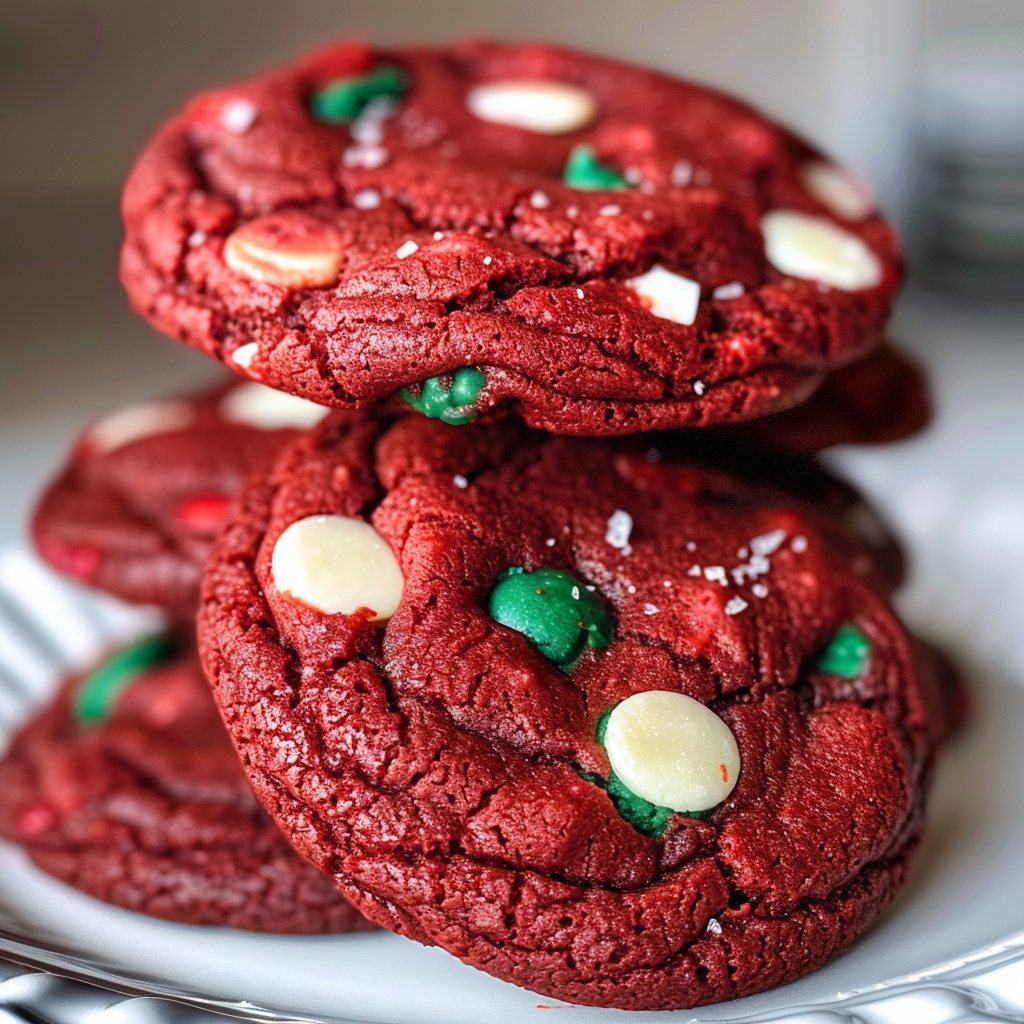
The mere thought of sinking your teeth into a batch of Festive Red Velvet Cookies is enough to make anyone weak at the knees. Imagine the soft, chewy texture paired with that rich cocoa flavor, tinged with a vibrant red hue that’s practically begging for a holiday celebration. sweet maple cookies As you pull them from the oven, their sweet aroma wafts through the air like an inviting hug, instantly making your kitchen feel like a warm, cozy haven.
These cookies aren’t just about looks; they’re bound to create memories that linger long after the last crumb has disappeared. Picture this: It’s a snowy afternoon, friends gathered around, laughter echoing as you share stories over a plate stacked high with these delightful treats. cinnamon apple crumb cake The joy of baking and sharing is truly amplified with Festive Red Velvet Cookies, making them perfect for any occasion that calls for a sprinkle of sweetness and a dash of holiday spirit.
Why You'll Love This Festive Red Velvet Cookies
- This amazing Festive Red Velvet Cookies offers more than just flavor; it makes meal prep a breeze.
- You can easily customize the ingredients based on what you have on hand.
- The vibrant colors and aromas make it visually stunning on any dinner table.
- Perfect for gatherings but versatile enough for casual snacking or special treats.
Ingredients for Festive Red Velvet Cookies
Here’s what you’ll need to make this delicious Festive Red Velvet Cookies: For more inspiration, check out this strawberry cheesecake cookies recipe.
- All-Purpose Flour: The base of our cookies; sift it to ensure they turn out light and fluffy.
- Cocoa Powder: Use unsweetened cocoa powder for that rich chocolatey flavor without added sugar.
- Granulated Sugar: This will give your cookies their sweet kick and help achieve that chewy texture.
- Baking Soda: The leavening agent that helps these cookies rise beautifully.
- Salt: A pinch enhances all the flavors in your cookies.
- Butter: Use unsalted butter, softened to room temperature for easy mixing and spreadability.
- Eggs: One large egg adds moisture and structure to our cookie dough.
- Vanilla Extract: Adds a lovely aroma and depth of flavor to your cookies.
- Red Food Coloring: The star ingredient that gives these cookies their festive hue—don’t be shy!
The full ingredients list, including measurements, is provided in the recipe card directly below.

How to Make Festive Red Velvet Cookies
Follow these simple steps to prepare this delicious Festive Red Velvet Cookies:
Step 1: Preheat Your Oven
Preheat your oven to 350°F (175°C). Line two baking sheets with parchment paper or silicone mats for easy cleanup.
Step 2: Mix Dry Ingredients
In a medium bowl, whisk together flour, cocoa powder, baking soda, and salt until well combined. This ensures an even distribution of flavors throughout your cookie dough.
Step 3: Cream Butter and Sugar
In a large mixing bowl, cream together softened butter and granulated sugar using an electric mixer until light and fluffy—about three minutes should do the trick!
Step 4: Add Eggs and Vanilla
Beat in the egg and vanilla extract until fully incorporated. Don’t forget to scrape down the sides of the bowl so no rogue butter clumps get left behind!
Step 5: Color Your Dough
Add red food coloring gradually until you achieve your desired vibrant hue. Stir it into the mixture until everything turns a beautiful red shade—this step is where all the magic happens!
Step 6: Combine Wet and Dry Ingredients
Gradually add the flour mixture to the wet ingredients while mixing on low speed. Mix until just combined; we want these cookies soft and cake-like—not overworked!
Transfer to plates and serve them warm with a glass of milk for that ultimate nostalgic experience! These Festive Red Velvet Cookies are sure to be a hit at any gathering or cozy night in—enjoy every bite!
You Must Know About Festive Red Velvet Cookies
- This amazing Festive Red Velvet Cookies offers more than just flavor; it makes meal prep a breeze.
- You can easily customize the ingredients based on what you have on hand.
- The vibrant colors and aromas make it visually stunning on any dinner table.
- Perfect for grilling but versatile enough for baking or pan-searing.
Perfecting Festive Red Velvet Cookies Cooking Process
The secret to perfect Festive Red Velvet Cookies is all about sequence. Start by creaming the butter and sugar until fluffy, then mix in the eggs and vanilla. In a separate bowl, combine dry ingredients. Gradually add the dry mix to the wet mixture until well combined.
Add Your Touch to Festive Red Velvet Cookies
Get creative with your Festive Red Velvet Cookies! Swap out regular flour for gluten-free options or toss in some white chocolate chips for an extra sweet surprise. You could even add a hint of peppermint for a seasonal twist!
Storing & Reheating Festive Red Velvet Cookies
To keep your Festive Red Velvet Cookies fresh, store them in an airtight container at room temperature for up to a week. If you’re reheating them, pop them in the microwave for 10-15 seconds to regain that soft, gooey texture.
Chef's Helpful Tips for Festive Red Velvet Cookies
- This amazing Festive Red Velvet Cookies offers more than just flavor; it makes meal prep a breeze.
- You can easily customize the ingredients based on what you have on hand.
- The vibrant colors and aromas make it visually stunning on any dinner table.
- Perfect for grilling but versatile enough for baking or pan-searing.
Mix your dry ingredients thoroughly before adding them to ensure even distribution of cocoa powder and baking soda. Avoid overmixing once you combine wet and dry ingredients to keep your cookies tender and fluffy. Chill your dough before baking; this helps prevent spreading and enhances flavor.
The first time I made these Festive Red Velvet Cookies, my friends declared me a cookie wizard! They couldn’t believe how easy they were to make and how much they loved the festive vibes they brought to our gathering.
FAQs About Festive Red Velvet Cookies
What are Festive Red Velvet Cookies?
Festive Red Velvet Cookies are a delightful twist on the classic red velvet cake. These cookies feature a rich, velvety texture with a vibrant red color, making them perfect for holiday celebrations. They typically include cocoa powder for a subtle chocolate flavor and cream cheese frosting as a topping, adding to their festive charm. The cookies are soft and chewy, providing a satisfying bite that everyone loves. These treats not only look stunning but also taste amazing, making them a favorite during the holiday season.
How do I store Festive Red Velvet Cookies?
To keep your Festive Red Velvet Cookies fresh, store them in an airtight container at room temperature. If you want to prolong their shelf life, consider refrigerating them. Make sure to separate the layers with parchment paper to prevent sticking. For longer storage, you can freeze the cookies in an airtight bag or container. Just remember to let them come to room temperature before enjoying again. Proper storage ensures that these delicious cookies maintain their soft texture and rich flavor.
Can I make Festive Red Velvet Cookies ahead of time?
Absolutely! You can prepare Festive Red Velvet Cookies ahead of time, making them ideal for holiday gatherings. You can either bake the cookies and store them as mentioned earlier or prepare the dough and refrigerate it for up to three days before baking. This allows you to have freshly baked cookies on demand, saving you time on busy days. If you’ve frozen the dough, simply thaw it in the refrigerator overnight before baking for optimal results.
What variations can I try for Festive Red Velvet Cookies?
There are plenty of exciting variations you can try with Festive Red Velvet Cookies! Consider adding white chocolate chips or chopped nuts for added texture and flavor. You could also incorporate spices like cinnamon or nutmeg to give them a unique twist. spiced pumpkin cookies For an extra festive touch, sprinkle edible glitter or festive sprinkles on top of the cream cheese frosting. moist pumpkin cupcakes Experimenting with different flavors and toppings can make your cookies truly one-of-a-kind while maintaining their signature red velvet charm.
Conclusion for Festive Red Velvet Cookies
In summary, Festive Red Velvet Cookies are a wonderful addition to any holiday dessert table. Their vibrant color and rich taste bring joy to any occasion, making them a delightful treat for family and friends alike. With easy storage options and various ways to customize your recipe, these cookies prove both versatile and enjoyable. Whether you serve them at gatherings or give them as gifts, they will surely impress everyone who tries them! Enjoy baking these delightful cookies this festive season!
Festive Red Velvet Cookies

Festive Red Velvet Cookies are a delightful holiday treat that combines a rich cocoa flavor with a vibrant red hue. These soft, chewy cookies fill your kitchen with a warm and inviting aroma, making them perfect for gatherings or cozy nights in. With their stunning appearance and irresistible taste, these cookies are sure to become a cherished tradition, spreading joy with every bite.
- Prep Time: 15 minutes
- Cook Time: 12 minutes
- Total Time: 27 minutes
- Yield: Approximately 24 cookies 1x
- Category: Dessert
- Method: Baking
- Cuisine: American
Ingredients
- 2 cups all-purpose flour
- 1/2 cup unsweetened cocoa powder
- 1 cup granulated sugar
- 1 tsp baking soda
- 1/2 tsp salt
- 1/2 cup unsalted butter, softened
- 1 large egg
- 1 tsp vanilla extract
- 2 tbsp red food coloring
Instructions
- Preheat your oven to 350°F (175°C) and line two baking sheets with parchment paper.
- In a bowl, whisk together the flour, cocoa powder, baking soda, and salt.
- In a separate bowl, cream the butter and sugar until fluffy. Beat in the egg and vanilla extract.
- Gradually mix in the dry ingredients until just combined. Add red food coloring until you achieve the desired hue.
- Drop spoonfuls of dough onto prepared sheets and bake for 10-12 minutes. Allow to cool before serving.
Nutrition
- Serving Size: 1 cookie (30g)
- Calories: 150
- Sugar: 10g
- Sodium: 80mg
- Fat: 7g
- Saturated Fat: 4g
- Unsaturated Fat: 3g
- Trans Fat: 0g
- Carbohydrates: 20g
- Fiber: 1g
- Protein: 2g
- Cholesterol: 20mg

Leave a Comment